I know quite a few photographers who hate post-processing their photos. While I fully agree on the part that photography should be more about being outside and taking these photos and less about sitting in front of a screen, I really think that a lot of them dislike it because they don’t know how to get started or how to get the most out of their photos. Let’s change that together.
Like everybody else, I really like to procrastinate on things that I am not good at. Every time I delay something I should have done or learned some time ago, it becomes harder and harder and I dislike doing it even more. I feel that a lot of photographers are having the same issue with post-processing their photos because they don’t know how to get started. Since there are already a lot of step-by-step tutorials available, I thought it might be much more helpful to explain how to learn new tools and techniques. I am a professional web developer and there are new frameworks, tools, and techniques every few months which makes it super important to be able to adapt and at least have a look at the "new hottest thing" to validate for yourself if it improves your workflow and results in some way or not.
If you didn’t try Luminar 4 yet you should definitely give it a try and download the demo version. If you like it you can save 10 €/$ with the coupon code LOCATIONSCOUT that can be applied on checkout.
How to start
The best part about tools like Luminar or Adobe Lightroom is that they are very easy to use. Luminar can be used as a standalone software where you open entire photo folders or you can use it as a plugin for your existing tools like Adobe Lightroom or Photoshop. Especially the second option is what I am using for now and why I like Luminar so much because it gives me full freedom over the tools I want to use.
If you are trying Luminar for the first time my most important advice is to simply try every slider and move them to the maximum and the minimum value to see what they are doing and how they are changing your photo. It’s almost always a bad idea though to use these extreme values for your final photo, so definitely make sure to use the sliders in a subtle way if you want to receive a realistic result.

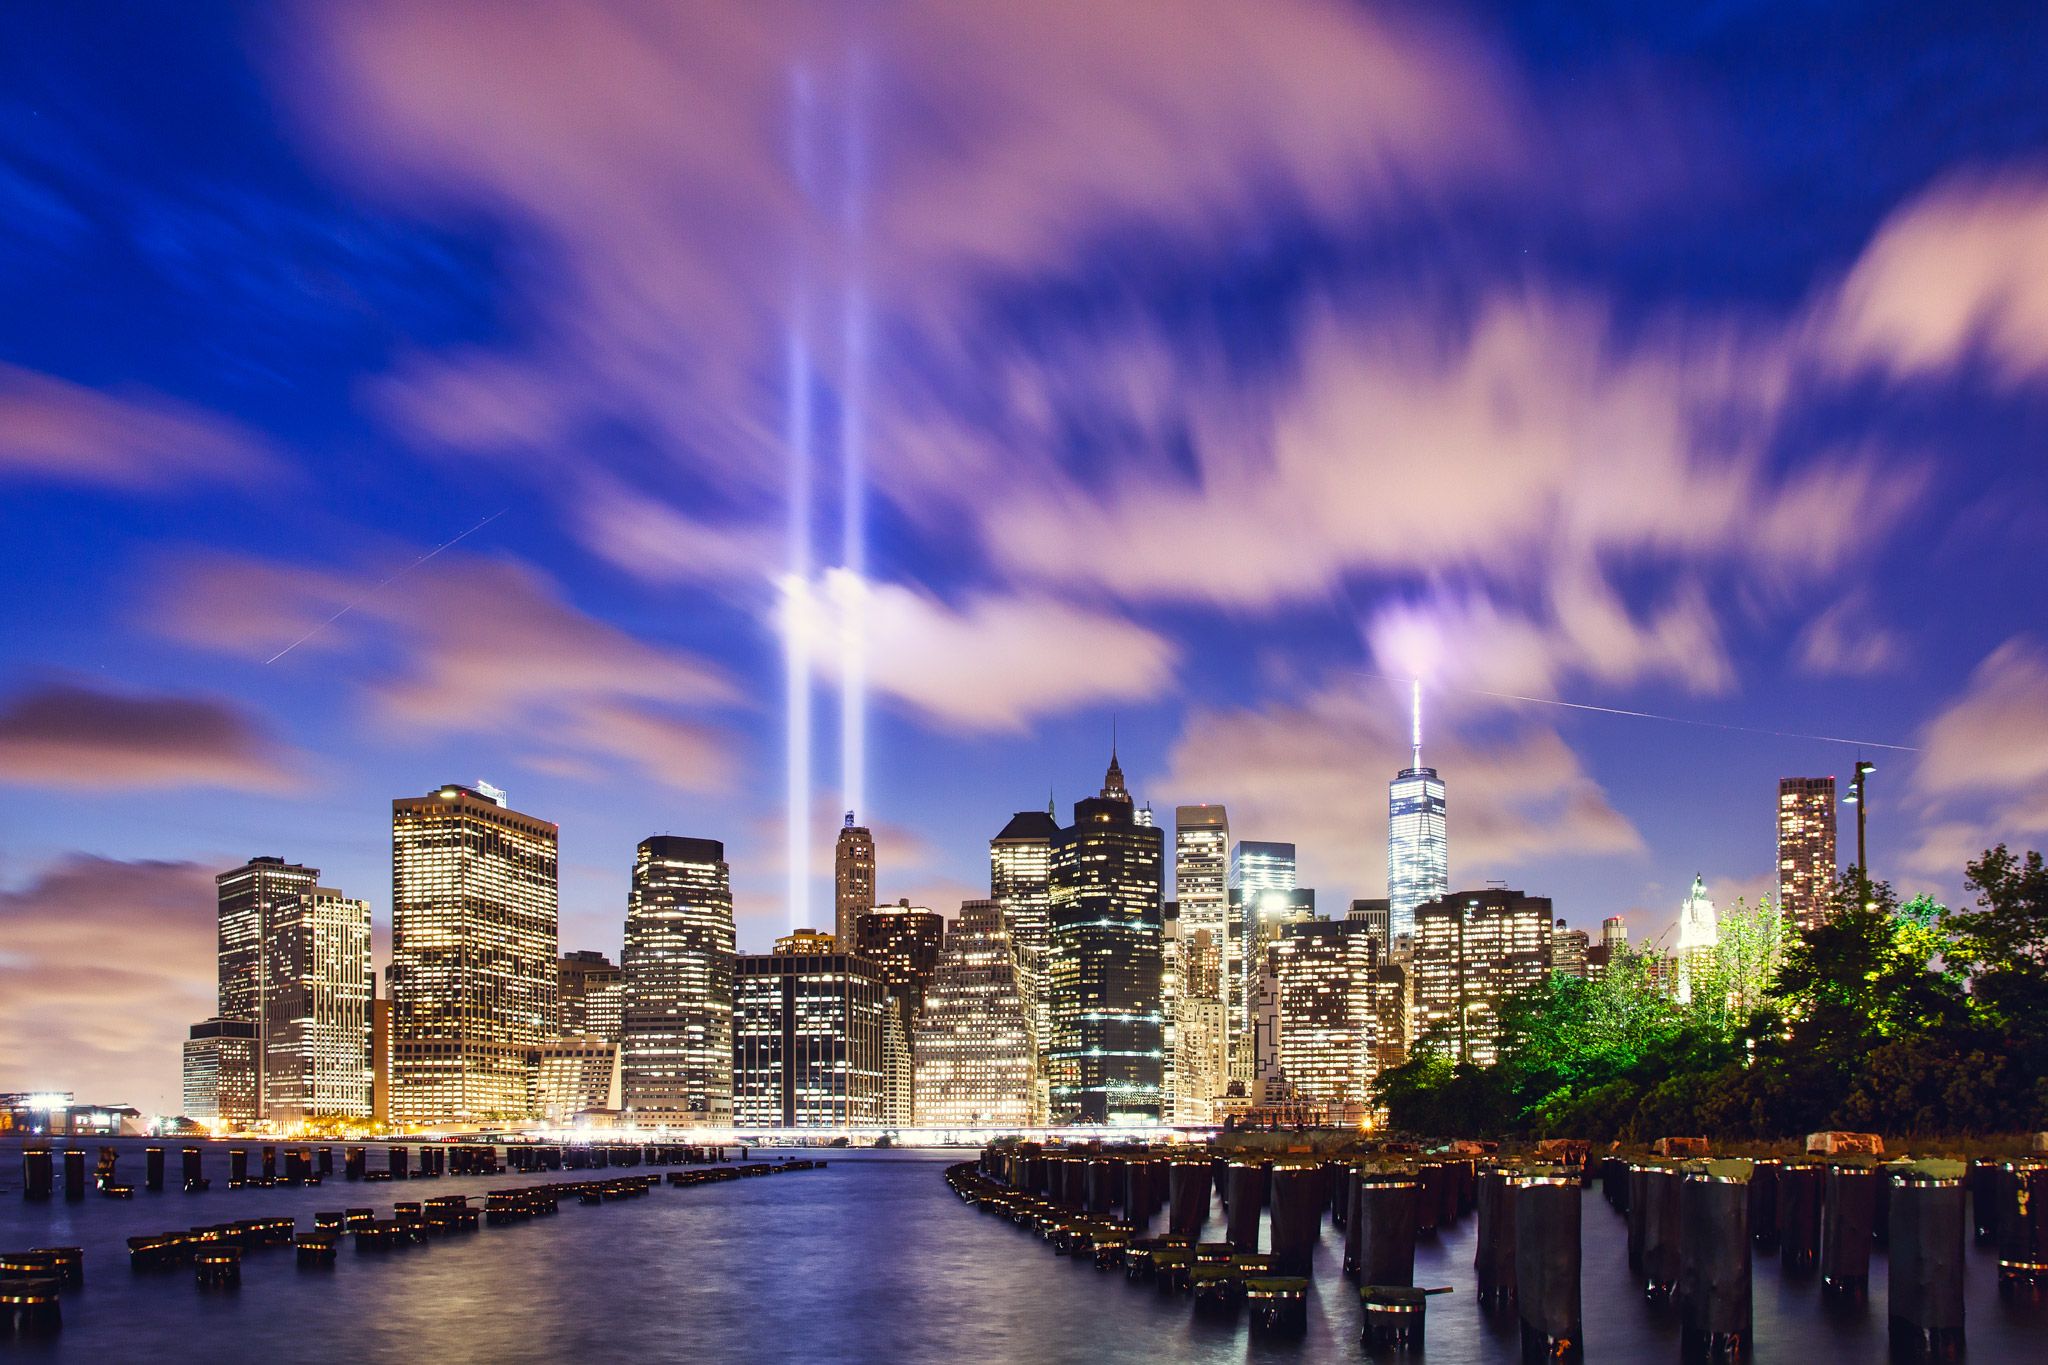
We will retouch this photo of New York together in this tutorial. The colors are completely wrong and everything looks just boring somehow. Let's change that with just a few steps.
Essentials
Let’s start with the Essentials which is the sun-icon on the right side of your screen when you have activated Edit in the top right corner. The order of the sliders is already quite good so I would recommend you to start at the top and try every slider, starting with the Temperature and Tint which I used in my photo to correct the extreme color shift of the skyline. Unless you are using a night filter in front of your lens (learn more about this topic in the article How to get started with Filters in Landscape Photography), scenes like this tend towards warm colors due to the light pollution of the city. Shifting the color temperature back towards blue and purple usually solves this issue quite easily, especially when you are shooting your photos as RAW files.
I don’t want to describe each slider here but if you have a question about a specific one feel free to ask in the comments below. Important to know is that this workflow is called non-destructive because you can undo these changes at any time without "destroying" your current result. Simply click the reset button in the top right of each section to reset the changes and try a different approach. By clicking on Advanced Settings you get even more settings that you might want to try out.

By changing just a few sliders the result looks so much better already. These sliders might be different for each photo so give it a try and use different settings to see what you like best.
As you can see these very few sliders already made a huge difference in my result and it took me less than 3 minutes to receive a result that I wouldn’t be ashamed of any more to share online. In general, a lot about photography is personal taste in my opinion and you should therefore never be ashamed of anything. I hope you get the point though on how easy and fast you receive results that are already good enough.
AI Filters
My favorite part about Luminar is the AI filters. I am a developer myself and I fully believe in AI tools because they can make our lives easier and workflows much faster. I know that a lot of photographers think that this is "no real photography" anymore because there is some algorithm that decides what your photo might need right now. In my opinion, quite the opposite is true because I can focus a lot more on taking photos. If a tool starts to learn my preferences that I am repeating for most of my photos anyway, I have a lot more time to pay attention to the details or decide to use the photo as it is to save time and have a great result with just a few clicks.

In my photo of the skyline of New York I used the AI Enhance and AI Structure filters to improve the contrast of the clouds and the reflections in the water.
Sharpening & Denoising
One of the most important steps is sharpening your photo. Tools like Luminar and Lightroom are achieving this by doing edge detection and highlighting them afterward. This can also result in a lot of grain which is why Luminar has an Edit Mask option below both tools. In my case, I could simply use a gradient to prevent Luminar from sharpening my sky. Since I used my old Canon 7D for this photo the sky has a lot of noise anyway and the Denoise filter can help me to reduce the grain in the sky. Using a mask can help here again to apply this filter only to the sky because the noise is barely visible in the skyline anyway and we would lose some of the details that we gained by sharpening the photo.

It's probably hard to see on this screenshot but the edges of the buildings are much more sharper now.

After using the Denoise settings with a mask, the noise in the sky became much better and isn't visible at all anymore without zooming in.
Improving the colors
My last step is usually to find a color scheme that I like for this specific scene. I felt like the clouds lost too much of the warm colors they had when I tried to adjust the scene to the correct color temperature and tint. That’s why I use the Golden Hour slider of the Landscape Enhancer to get the warmth back. A mask is again helping me to apply this filter only to the sky and not to the skyline itself.

The Golden Hour slider is helping me to get the warmth back to the sky. By using a mask again we make sure to only apply it to the upper area of the image.
I am finishing my photo by applying a little bit of Matte Look and the Venus Color Style which fits the best for what I want to have as a final result. Both filters can be found in the Creative section on the right side.

I really like to use some very subtle color filters at the end of my workflow to receive a consistent color scheme.
After only 5 minutes I already have a result that I like. I used to sit for hours in front of my photos to have a result that I could print in huge sizes for my own and friends. Not every photo needs so much attention though, especially if you just want to share it via Social Media where most of the details aren't visible anyway. I still like to put a lot more work into my photos because I enjoy post-processing but I hope that this example shows you that you don't have to practice for years and invest 4-8 hours in one photo if you don't want to.
This is where we started...

... and this is the final result after only 5 minutes.
Final advice
The most important part of post-processing is learning more about masks. They are the very best tool to apply a certain filter or change to a selected area. This is also the reason why I like Luminar so much as an extension to Adobe Photoshop. It fits perfectly in my workflow and I can use these amazing AI filters to apply them only to certain areas of my photo by using a mask in Photoshop afterward or directly in Luminar if the scene isn’t too complicated or if I don’t want to invest too much time into it.
This is somehow identical to how I photograph cities. I pay attention to just one detail which might be a train that is crossing only every 30 minutes. Taking the perfect shot of the train is, therefore, crucial because I might have only one try during sunset or blue hour. Afterward, I can focus on the clouds in the sky, the cars, or anything else. Merging these parts together afterward in Photoshop via layers and masks is a great technique to get the best moments combined in one final beautiful photo.
You can download the demo of Luminar 4 for free and give it a try. If you like it you can save 10 €/$ with the coupon code LOCATIONSCOUT that can be applied on checkout.
Let me know about your thoughts or questions in the comments below!


Comments (8)