
Indonesia Pulau Dua Balantak
The Magic of Blue Hour at Pulau Dua.
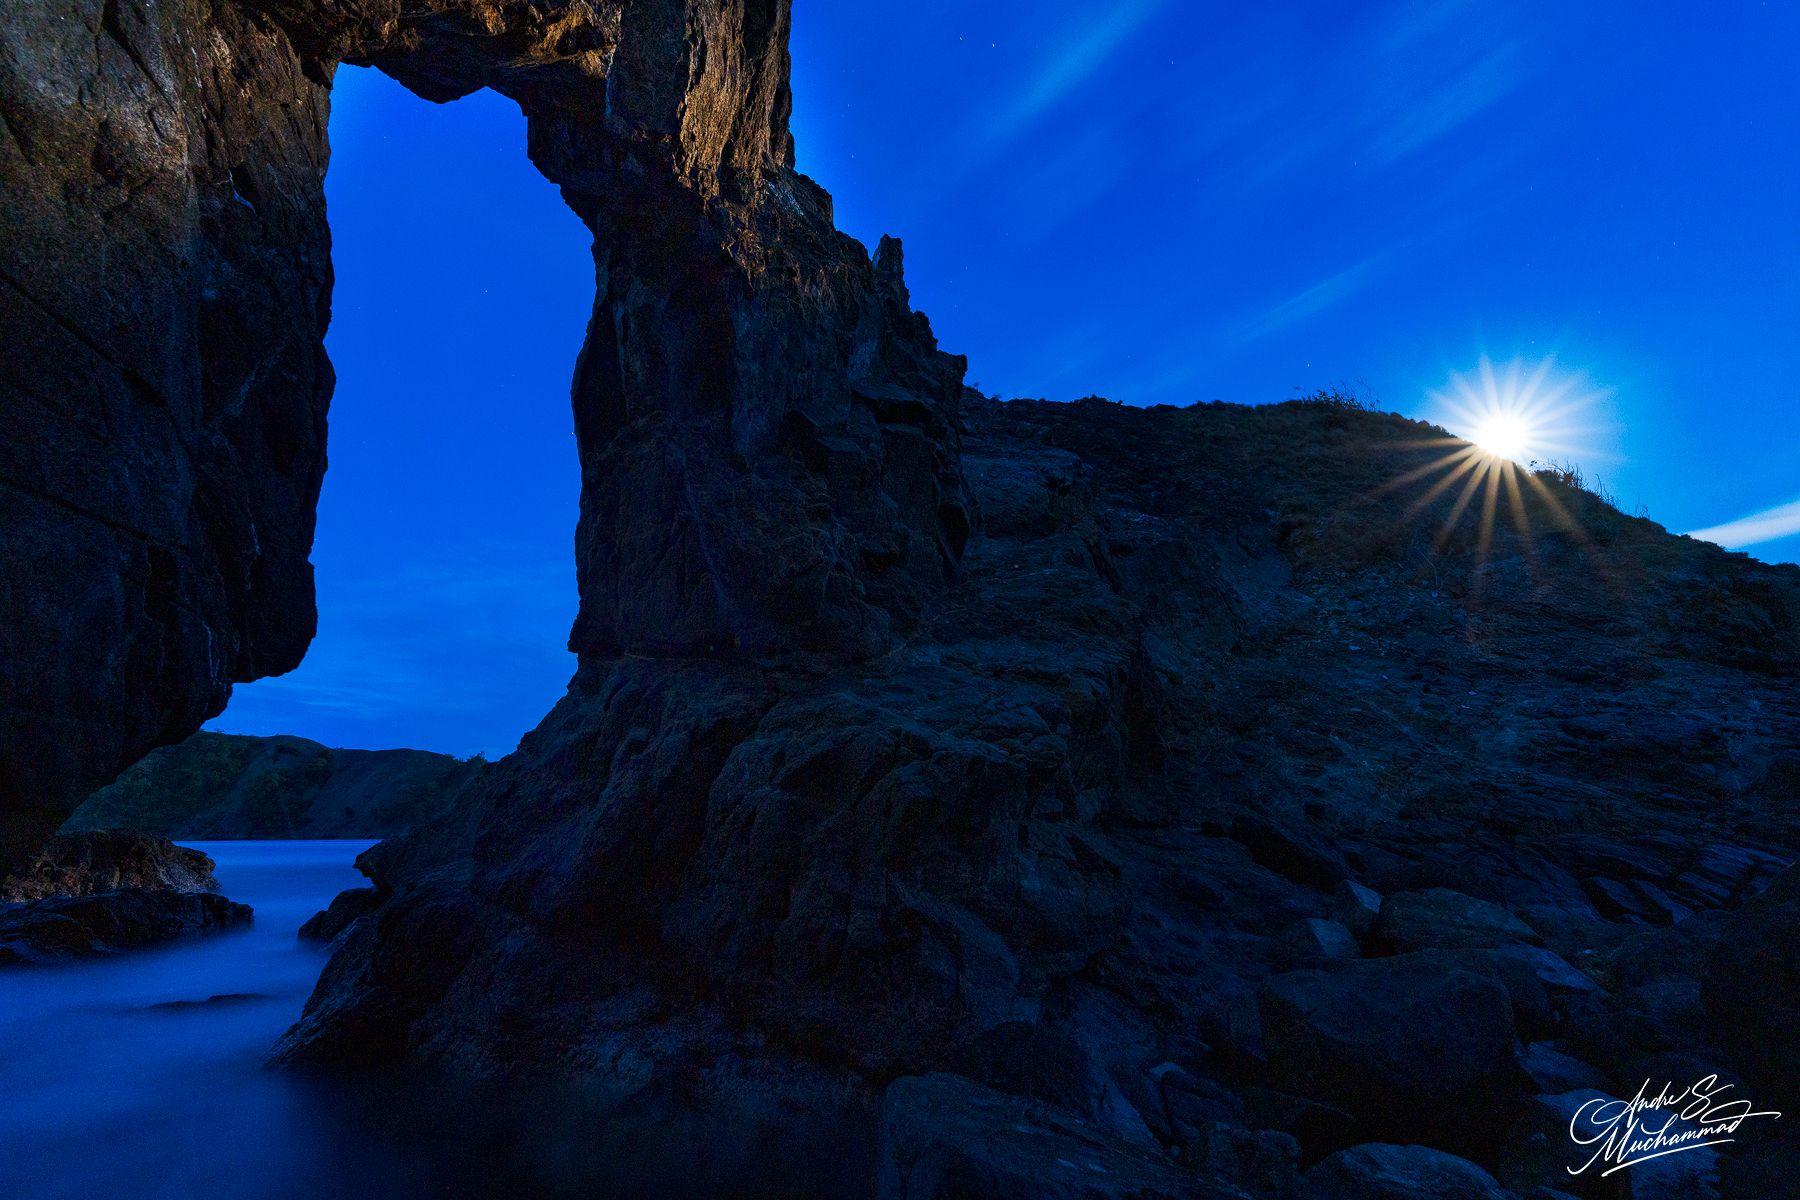
This shot perfectly illustrates why photographers call this time of day "magic hour." Just as the sun has dipped below the horizon, the sky transitions into a deep, velvety indigo, casting a cool, serene glow over the rugged limestone cliffs.
This shot perfectly illustrates why photographers call this time of day "magic hour." Just as the sun has dipped below the horizon, the sky transitions into a deep, velvety indigo, casting a cool, serene glow over the rugged limestone cliffs.
Photography Tips
1. It’s All About the Timing
The "blue hour" is that sweet spot just after sunset when the sun is below the horizon but the sky still has a beautiful, rich blue hue. For the best "moon-star," you also need to time your shoot with a bright, clear moon (ideally near a full moon or a very bright crescent). This gives you the maximum contrast and that signature flare against the deep blue sky.
2. Master the "Moon-Star" (The Starburst Effect)
That sharp, symmetrical "star" is created by diffraction. Here’s how to get it consistently:
Small Aperture: You must set a small aperture, around f/16 or f/22. This is the key. The smaller the hole, the cleaner and sharper the star points will be.
Point Light Source: Ensure the moon is small and bright in your frame. A large, diffused moon (like on a cloudy night) won’t work as well.
3. Stabilization Is Non-Negotiable
Since you’re using a small aperture and shooting in the dark, you’ll need a slow shutter speed—probably between 10 to 30 seconds (or more). You cannot hand-hold this shot.
A Tripod Is Essential: Get a sturdy tripod to keep your camera perfectly still.
Remote Shutter or Self-Timer: Even pressing the shutter button can shake the camera slightly. Use a remote shutter release (wired or Bluetooth) or set your camera's self-timer to 2 seconds to ensure no movement.
4. Compose for Mystery and Leading Lines
Use the natural features of Pulau Dua to your advantage:
The Natural Arch: Your composition beautifully frames the distant sea through the natural arch. This adds mystery and depth.
Foreground Rocks: Include prominent rocks in the immediate foreground to create leading lines that draw the viewer’s eye through the arch and toward the moon.
5. Pay Attention to Focus (Manual Focus Is Your Friend)
In low light, your camera’s autofocus might struggle. It's safer to use manual focus.
Focus on the Moon: Zoom in on the moon using your camera’s "Live View" screen, then manually adjust the focus until it is a tack-sharp point. This ensures everything in the scene is sharp.
[Image showing a close-up of a DSLR lens with "AF" switched to "MF"]
6. Control the Noise (Manual ISO)
You don't want your beautiful blue hour photo to look grainy. Keep your ISO low, typically between ISO 100 or 400. This will provide the cleanest, noise-free image, allowing you to capture the textures of the rocks and the deep tones of the sky.
7. Embrace the Silky Water Effect
Since you're using a long shutter speed (10-30 seconds), any moving water, like the sea flowing through the arch, will appear smooth and silky. This is a deliberate choice that adds a tranquil, almost ethereal feel to the image. It complements the deep blue hour perfectly!
Travel Information
1. Fly to Luwuk (Syukuran Aminuddin Amir Airport (IATA: LUW, ICAO: WAMW), commonly known as Bubung Airport
Most travelers fly in from Makassar (UPG), which has daily direct flights to Luwuk.
There are also occasional connections from Manado or Palu, but Makassar is the most reliable hub.
2. The Road Trip: Luwuk to Balantak
Once you land in Luwuk, you need to head east toward the Balantak region.
By Private Car/Rental: This is the most comfortable option. The drive takes about 3 to 4 hours. The roads are generally paved but can be winding as you pass through coastal hills and local villages.
By Motorcycle: If you’re feeling adventurous, you can rent a bike in Luwuk. It’s a beautiful ride, but make sure you’re prepared for the distance.
Target Destination: Aim for Desa Kampanga or Desa Pulo Dua in North Balantak. These are the main "gateway" villages where you can find a boat.
3. The Boat Crossing
When you arrive at the shore in Balantak, the islands are clearly visible just a short distance away.
Charter a Local Boat: You can hire a "ketinting" (traditional small motorized boat) from the local fishermen.
Cost: It usually costs around Rp 200,000 – Rp 400,000 for a round trip, depending on your negotiation skills and how long you plan to stay.
Duration: The boat ride is very quick, taking only 15 to 20 minutes to reach the island.
Spot Type
Outdoor
Crowd Factor
Nearly no other people
Best Timing
Blue hour/at night in summer
Sunrise & Sunset
05:44 - 17:48
| current local time: 14:39
Photo Themes
blue hour
Sunset
Locations
Central Sulawesi
Banggai
Spot comments (0)