Learn how to get beautiful and realistic results within difficult light situations by using this great and easy way to do exposure blending with Luminosity Masks in Photoshop.
Another essential technique for city- and landscape photographers is Luminosity Masks. In my last tutorial, I explained to you how to stack multiple exposures with Focus Stacking to get sharper images from the fore- to the background. In this article, we will use multiple exposures again, but this time we will use them to recover dark and bright areas within our images. This may sound like doing an HDRI (High Dynamic Range Image) and the basic idea is definitely similar, but the outcome is much more natural and therefore a better way to handle difficult light situations.
Why plain HDR isn’t good enough anymore
Before we talk about what exactly Luminosity Masks are, we should have a look at the HDR technique again, that so many photographers are or were using. The basic idea behind HDR photos is to take multiple exposures with different exposure times, to get one image with a short exposure for the highlights, one long exposure for the dark areas, and the usual shot you would take. You can even use more than 3 photos, but usually, this is a good point to start.
There are a lot of HDR-softwares available and even Adobe Lightroom can automatically combine multiple exposures to an HDR. The outcome is an image with a very high dynamic range, that your monitor can’t even display properly. To be able to display the image on your monitor, your software usually does something that’s called "Tone Mapping". This step is compressing the dynamic range of your image along different settings again so that your monitor is able to display it again. The quality of your settings will now define how HDRish or realistic your image will look.
You may have noticed the disadvantage of HDR yourself: You are blowing up your image to "compress" it afterward again. This process will create an entirely new image based on global settings, which often tend to have issues with noise and halos.
How do Luminosity Masks work?
The idea behind Luminosity Masks is to start with your basic exposure and to blend in the parts, that are too bright or too dark. With this technique, you will stay at your initial file format and only blend in parts of your image, that need to be recovered. For this reason, the outcome will automatically be more natural, since there is no mapping between brightness and color required. You could do this manually by creating these masks by yourself, but fortunately, there are some tricks to generate them automatically in an easy way. Nonetheless, this way of blending is much more selective and local, which gives you the freedom to blend in only the parts you really need. This is extremely useful when you have moving objects like waves or leaves in your scene because automatically merging them usually isn't working smoothly.
The following video by Jimmy McIntyre explains the process within Photoshop very well. He is a great photographer and does a lot of great tutorials about Luminosity Masks, so you should definitely have a look at some of his other videos if you want to learn more about blending.
Important takeaway
Digital blending gets difficult as soon as the initial images are too far away from each other. Bringing the brightness closer to the initial image makes it a lot easier to blend them afterward and the quality won’t even suffer, because you won’t use the grainy parts of your image anyway. Just make sure, that the parts you will use are well exposed and still look natural while adjusting the brightness of the unused parts to your original image.

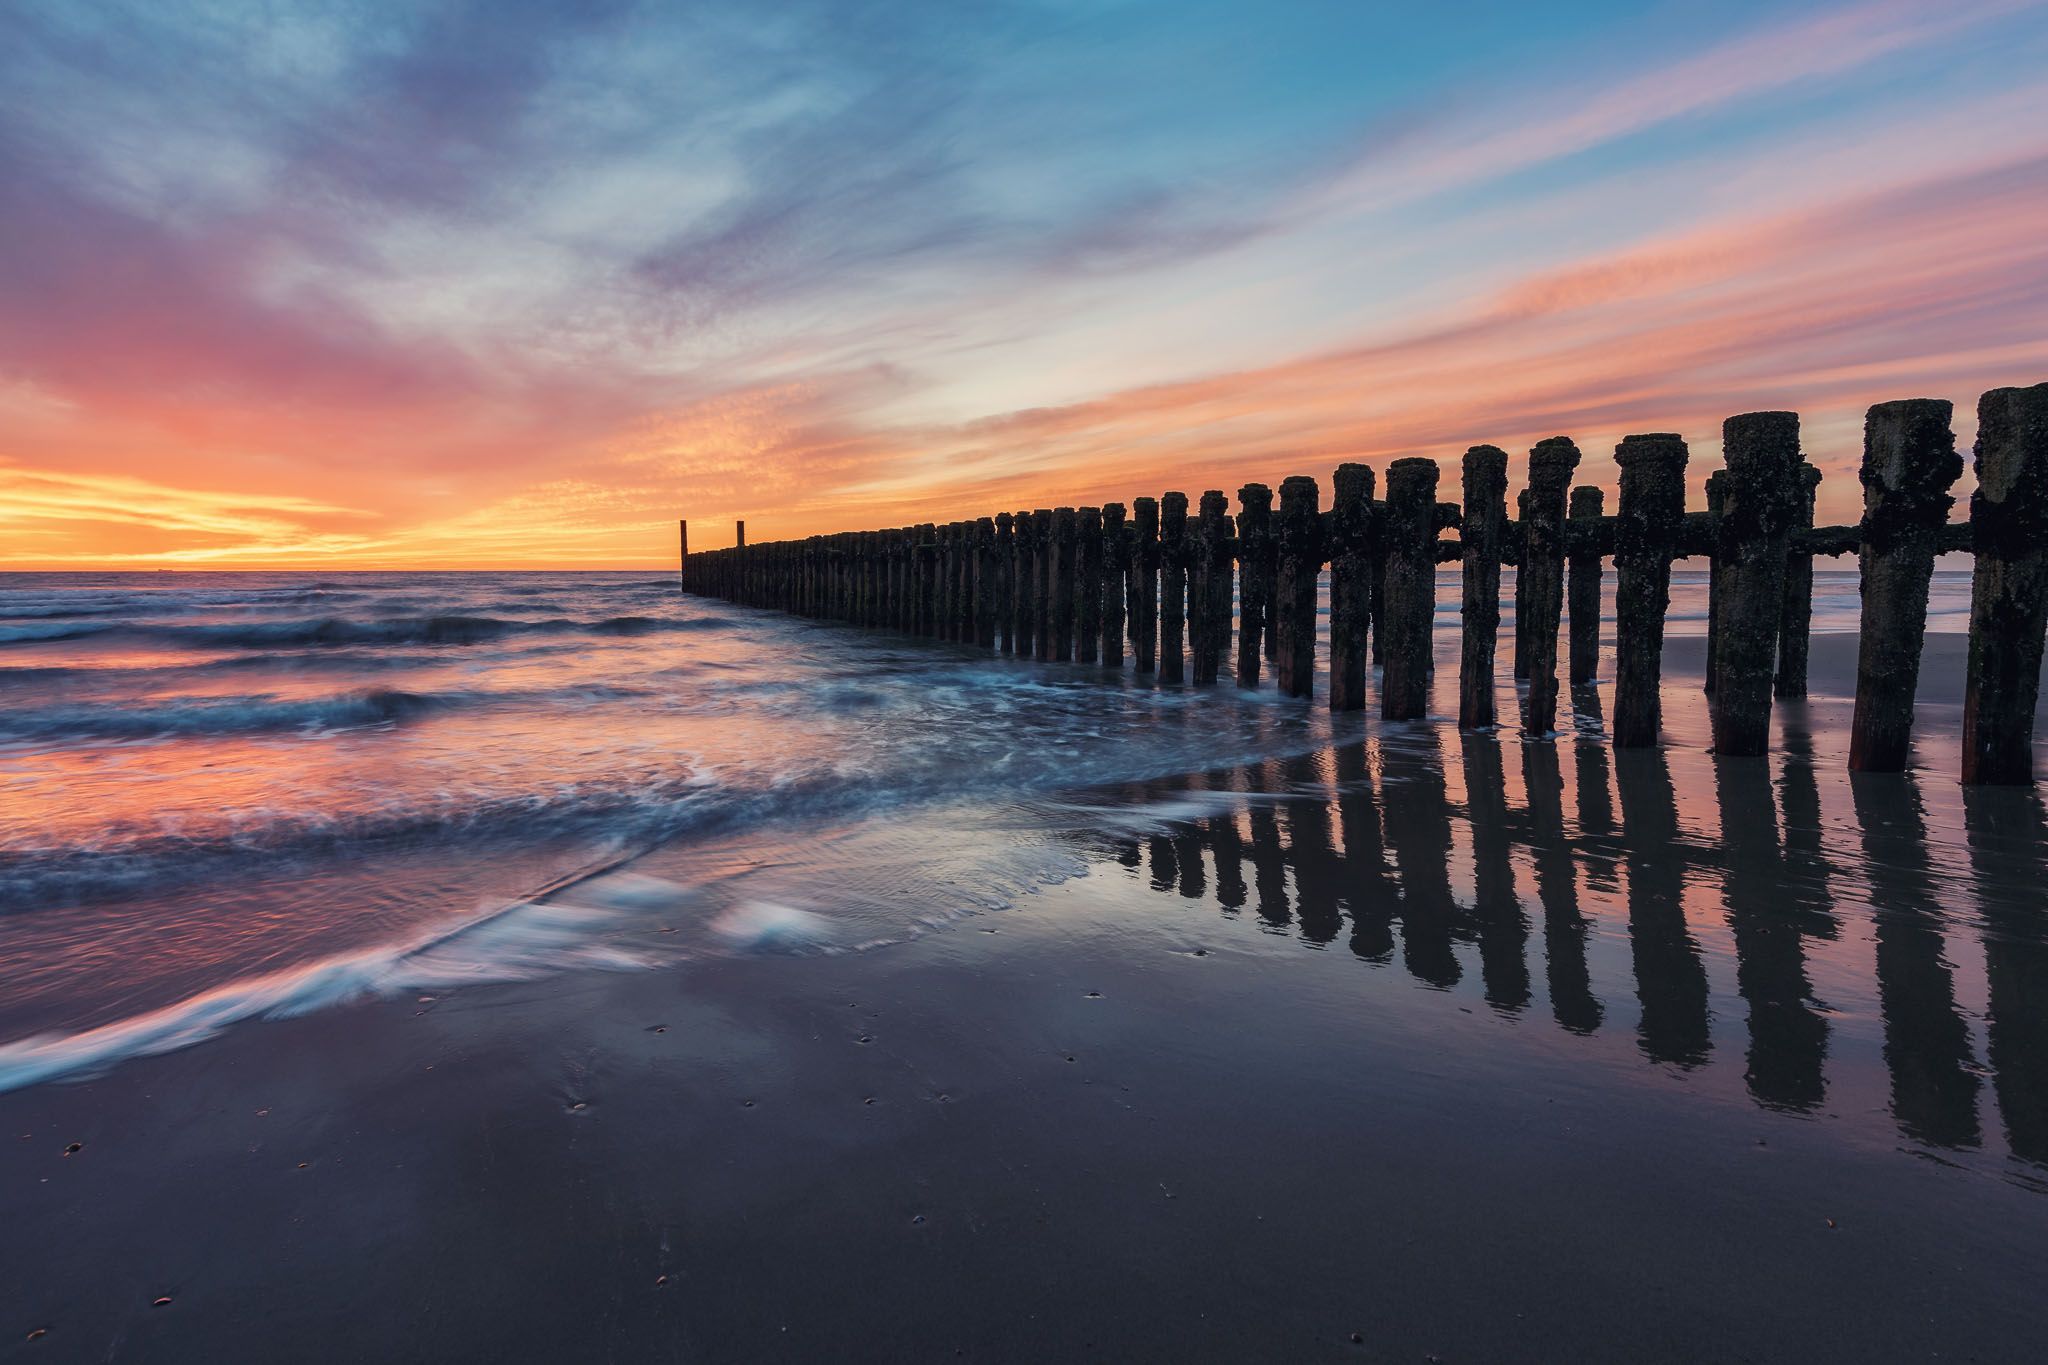
The initial normal exposure.

A shorter exposure (-2 stops) for the highlights in the sky.

A longer exposure (+2 stops) for the wooden stakes and smoother waves.

The final blended image, based on Luminosity Masks. The images were taken at this spot near Domburg in the Netherlands.
Final thoughts
Luminosity Masks definitely create more natural blendings, but HDR is still a viable option for different situations. Sometimes it’s even a good point to start with creating an HDR via Lightroom and to use Luminosity Masks afterward. This technique just gives you the ability to blend in anything you need to get the best possible outcome.
A lot of photographers (me included) often tend to forget, that all too frequently a single exposure can be enough to get a great result, especially with new camera sensors getting better and better with higher dynamic ranges. Checking and understanding the histogram is a good way to improve your perception of different situations. In case of uncertainty, I would definitely recommend you take multiple shots, even if you won’t need them in your post-processing. Don’t forget about the extra effort for blending and additional disk space though, so getting it right in camera is always a good idea.
I am usually underexposing my photos a little bit because most of the sensors are better in capturing details within dark areas. That’s why it’s much easier to recover these parts of your image in post-processing.
Are you already using Luminosity Masks or do you still prefer HDR? I would love to hear from you in the comments below!


Comments (9)