It’s often much easier than you might think to find and set the best camera settings for a specific scene. Especially for beginners terms like ISO, exposure time, f-stop and focal length may feel too complicated at first. So let's dive a little bit deeper into the possibilities you have and which few settings you should really care about.
Particularly for anybody who just started photographing with a "bigger" camera, all these settings might be overwhelming at the beginning. Switching from smartphone photography to a DSLR or a mirrorless camera suddenly gives you way more opportunities, but often makes it also harder to decide on the best available settings. This is why I still see quite a lot of people shooting in auto-mode, which is fine to get a better feeling for the camera handling itself, but if you want to keep shooting like that, the current generations of smartphones are surprisingly often a better choice.
The reason why I am saying this is, that in my opinion the big cameras still have the better image quality, but if you want to take a snapshot during the day, smartphones are definitely not a bad choice for 3 underrated reasons:
- Price - they are usually way cheaper for what you get
- Weight - The best camera is the one you currently have with you
- Effort - Using a smartphone to share or edit photos is just so much easier and faster
On the other hand, you will gain a lot of freedom by using a separate camera, but only if you start learning and using individual settings. I am drawing so much attention to this because it’s important to understand when which tools might be the best choice, which also means that buying a big camera won’t automatically get you better pictures. So let's talk about the settings that will definitely improve your photos and which ones you might pay less attention to at the beginning.
Common camera settings
In this article, we will focus on the usual settings you will have to pay attention to when starting photography. If you have a look into the EXIF details in Adobe Lightroom for example, the following 4 terms are the most important ones you need to know and to understand. I will only describe them with a few easy words and pay more attention to the importance of landscape photography.
ISO
The ISO defines the light sensitivity of your sensor. The higher the value, the more sensitive it is to light, which comes at the cost of image quality. Increasing the ISO results in grain, which highly depends on the camera you are using.
My advice: In landscape photography, we are usually using a tripod. Increasing the ISO to achieve a lower exposure time is therefore in most cases not necessary. Set this value nearly always to the lowest value, which is usually ISO 100 or 200. Some cameras even offer ISO 50, but make sure first if this setting is the lowest default or if the camera is faking the ISO (this is for example the case for the Sony A7 series, where ISO 50 is possible, but it’s not gaining a better quality - quite the opposite is true).
TL;DR: ISO 100 and you are good to go.
Exceptions: Astro Photography is only possible with higher ISO values and you might need a higher ISO if you want to capture motion without blur during low light conditions.

This photo from Haifoss, Iceland was taken with the following settings: 15 sec at f-8, ISO 50 with 16 mm. Probably better would have been ISO 100 at f-9, but the difference is often not even visible. Because this photo was taken during daylight I had to use an ND filter to force a longer exposure to get that soft shape of the water and the clouds.
Exposure Time
The exposure time is the amount of time the sensor is gathering light through your lens. The longer the exposure time, the brighter your photo will be. Moving objects will blur with longer exposure times, so this setting depends on what you are shooting and how you want it to look.
My advice: Landscape photographers usually like longer exposure times for a good reason. It gives you the opportunity to soften parts of your image that are moving (water, clouds, cars etc). This doesn’t only provides a better focus on the detailed parts of your photo, but it also makes sure that it won’t look so much like a snapshot you took with your smartphone. If you are not shooting a very specific scene during hard lighting conditions and as long as you are not photographing before sunrise or after sunset, you should set your camera to „Aperture Priority“ (often marked with an A on the settings wheel). This means, that the camera chooses the perfect exposure time automatically for you and this is totally fine because in most cases it’s just important to capture all the light information within the scene without under- or overexposing the result. Learn more about that in How to get perfect exposures for every photo you take.
TL;DR: Use the A-Mode (Aperture Priority) of your camera to get a good exposure time and don’t set it manually if you don’t need to.
Exceptions: Sometimes you want longer exposures, for example when shooting flowing water. Instead of increasing the exposure time manually and risking overexposed images, you should use ND filters instead. Read more about that in my article This is WHY and WHEN you really need ND filters or polarizers.

For this photo at Big Ben, London I used the following settings: 8 sec at f-11, ISO 100 with a focal length of 17mm. Because I wanted that typical passing bus light, I just needed to show up at this spot at the right time, which was around blue hour. Because of the low light situation, the exposure time went automatically up to 8 seconds, which was needed anyway to capture the light trails.
F-Stop
The f-stop depends on your lens. For example, I am using the Zeiss FE 16-35mm F4 lens. In this case, the "F4" in the naming of the lens tells you, that this is the lowest value you can set the f-stop to with this specific lens. The lower this number is set to, the more light can pass through your lens onto the sensor. Using a low number allows a shorter exposure time, but also adds unsharpness (bokeh) to your photo, depending on the focal length. The higher the focal length and the lower your f-stop value is, the smaller your sharp area will be and the more bokeh you will have.
My advice: In landscape photography you usually want to capture everything as sharply as possible and I am not talking about moving objects here, but just about the actual focus within your scene. You will achieve the best results here if you have a look at the test results of lens testing websites and see where your lens has the sweet spot. This is the f-stop when the lens will result in the sharpest possible image quality, which varies quite a lot from lens to lens. In general, you should choose a value between f-8 and f-11 here. This is usually the area where most of the lenses will result in great quality, but you will also ensure to have everything in focus. Try different settings and play around with this value to understand the changes, because this is probably the most important setting you need to understand because it changes the result in a way that can’t be fixed in post-processing. If you expose your photo too short and it’s too dark, it’s still easy to fix that with just a small or even no decrease in image quality, but you can’t regain the details from a blurry photo.
You might think that increasing the value even higher will result in even sharper photos, but after f-11 most of the lenses will decrease in sharpness due to something that is called lens diffraction.
TL;DR: Set your f-stop between f-8 and f-11 to get an overall sharp photo.
Exceptions: Sometimes you want to have a nice bokeh in your landscape photos, something that is essential for every portrait photographer. Another exception depends on the camera you are using because especially full-frame cameras and very wide-angled photos often require a technique that is called focus stacking. This is the case when the f-stop around f-11 is still not resulting in a photo that is sharp from the fore- to the background.

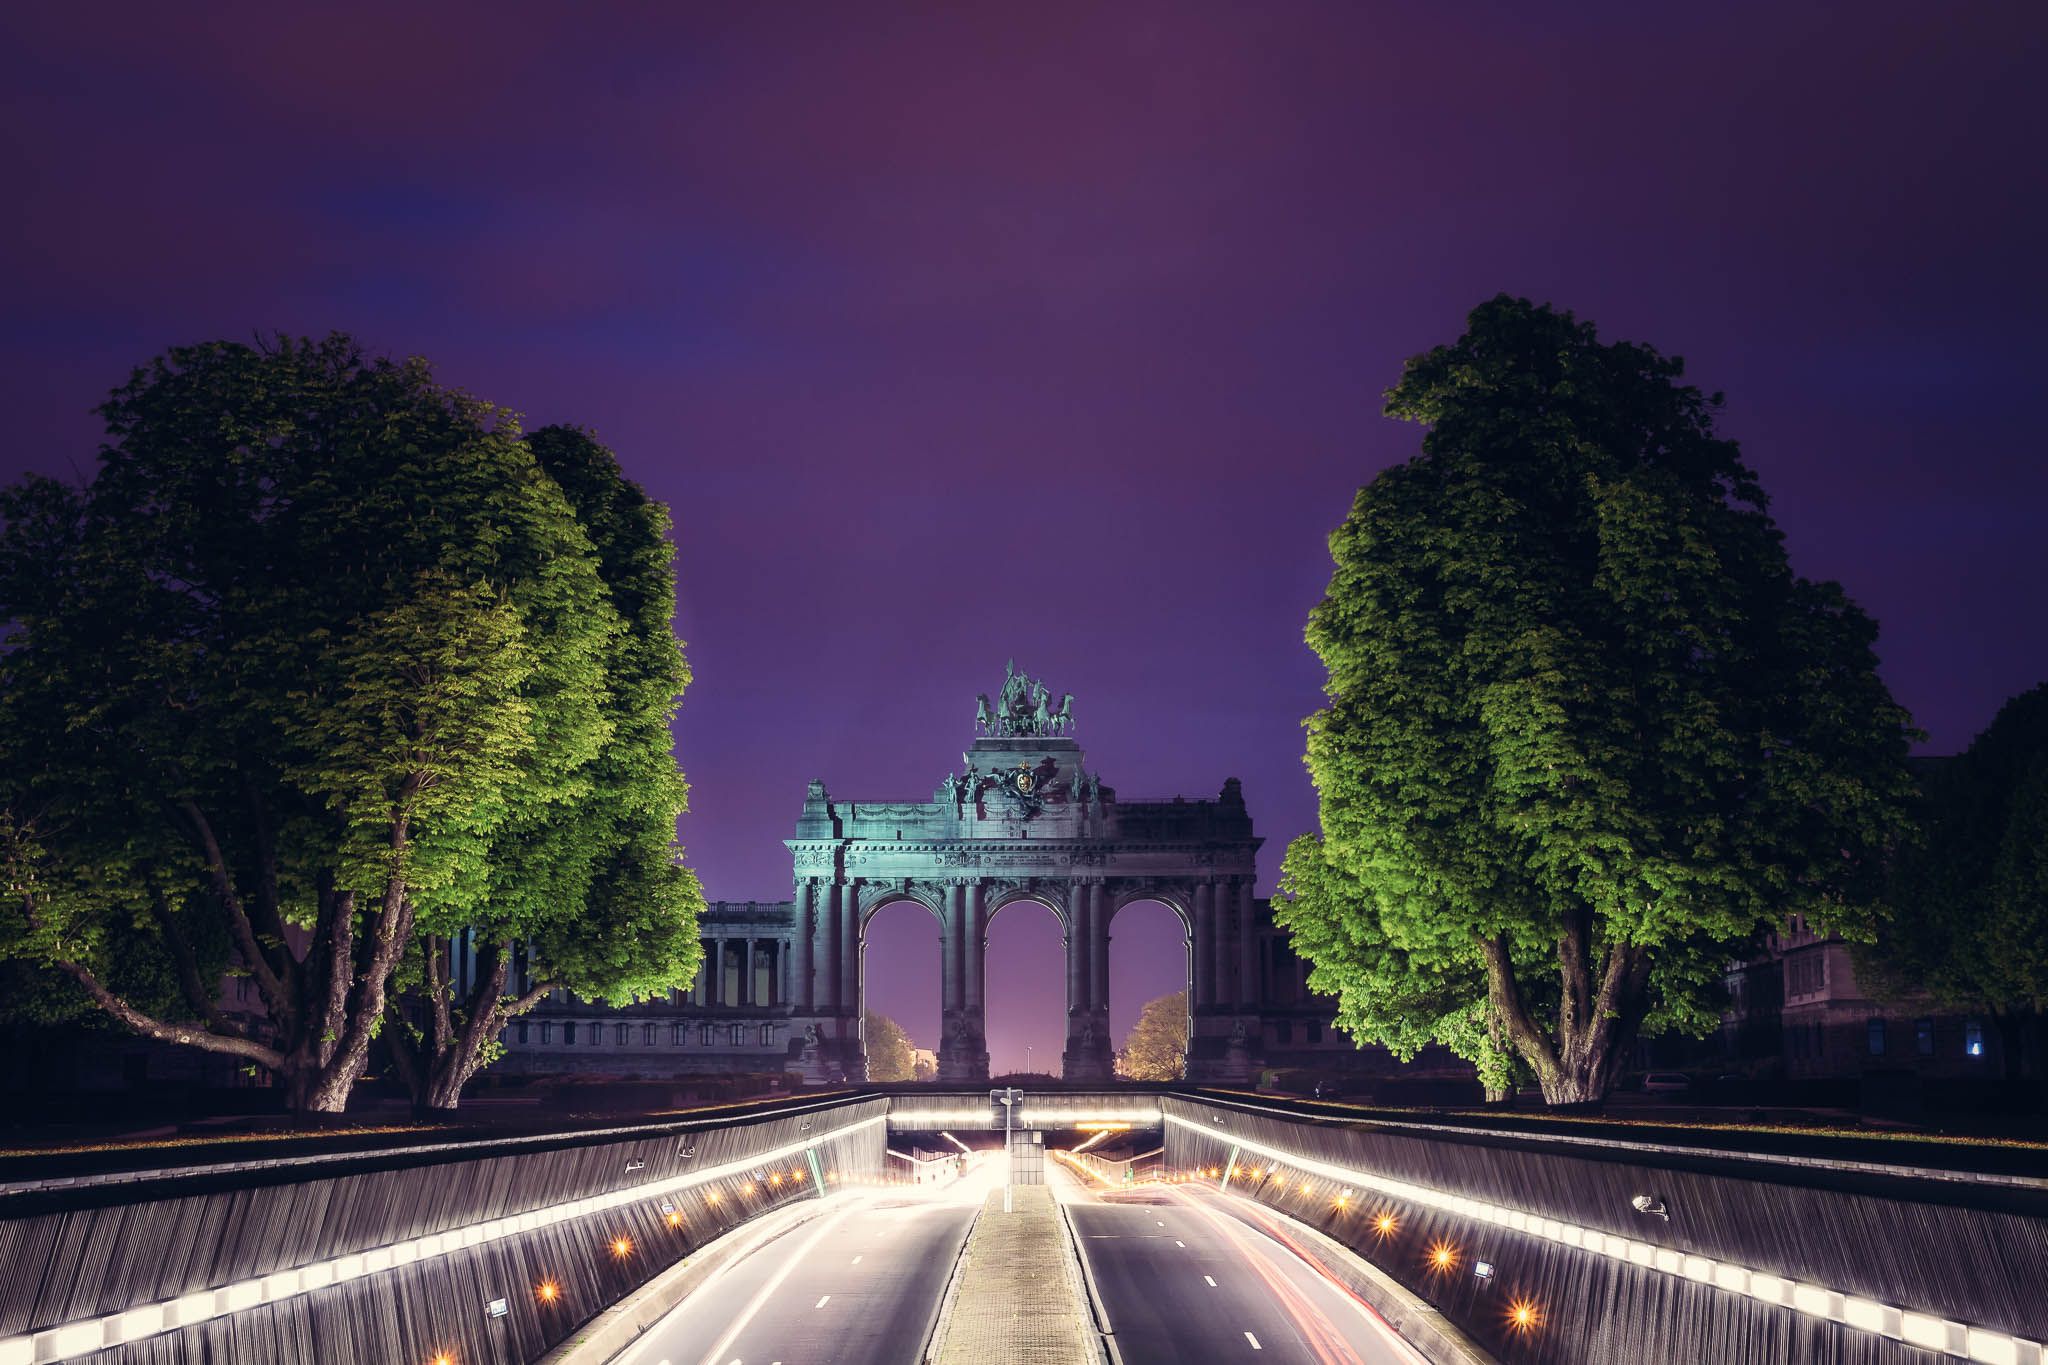
Just as the image above, this photo from Jubelpark, Brussels was taken with the same f-stop at f-11 and the same ISO, which was 100. The focal length was set to 33mm, the only difference was the exposure time of around 42 seconds, which isn't possible in A-mode, because most of the cameras will allow a max of 30 seconds. If that's not enough, you might want to switch to a bulb in manual mode and control the exposure time with your remote control to a length that fits best for the current light situation. A great alternative could have been to set the f-stop to f-9, which would have been fine as well and which would require a shorter exposure time to get the same result.
Focal Length
The focal length is basically the zoom of your lens. The lower the value, the wider your angle of view will be. If you come back to my lens, the Zeiss FE 16-35mm F4, the naming already tells us that it has a focal length between 16 and 35mm, which is pretty wide, but something most of landscape photographers will use as their standard. Beginner camera bundles usually have an 18-55mm lens, which is usually a decent one to get started. The actual zoom you can achieve with your lens is also depending on the sensor size of your camera but let's keep it simple and stay with the following take-home message.
TL;DR: The higher the value, the more zoomed in you are. Use whatever suits best for your specific scene and what looks best for you.
Exceptions: In general, there is no universal advice and therefore no exception here for this setting because it fully depends on the scene and the parts you want to include in your final photo.
Summary
As you saw, finding the correct settings for landscape photography is pretty simple, because you usually will use the lowest ISO and set the f-stop between f-8 and f-11. The exposure time gets calculated automatically and the only thing you want to change based on the scene is the focal length of your lens. This is of course a very simplified view of the basic technique, but that’s all you need in the beginning to get a good photo. This approach is already better than the automatic mode of your camera, which might crank up the ISO or set the f-stop to a value that will result in a partially blurry photo.
The only thing that is definitely important for this basic setup is a good tripod and ideally a remote control, because when you are taking a photo that way you don’t need to care about your own movement and that you need a short exposure time to get sharp photos without any blur.
Let me know your thoughts or questions in the comments below!


Comments (14)